
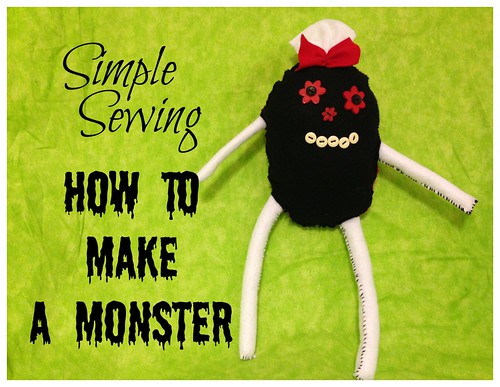
My 7 year old daughter has been learning how to sew with a sewing machine but I also want her to learn basic sewing by hand. I tried to come up with some way that would make learning seem more fun than just stitching together a few scraps with no real purpose. I recently made a few dolls using the sewing machine that she really liked but trying to duplicate that by hand would be time-consuming and tedious as well as a big mess when the cotton fabric started to fray. So I settled on fabric that wouldn’t fray and wouldn’t be too stretchy – felt – and instead of following a pattern, I decided to free-hand a design to match one of my 5 year old’s drawings. I also rounded up some polyester stuffing, a large-eye needle, some embroidery thread, and some buttons. I happened to have some cute, fancy flower ones but you could use any.
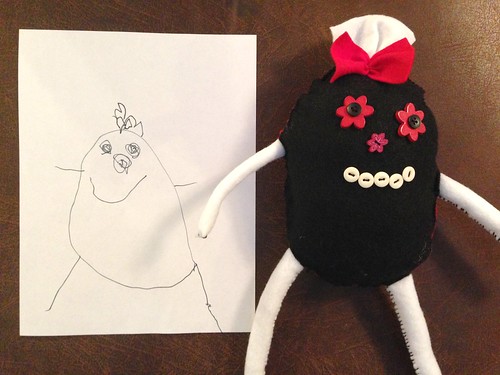
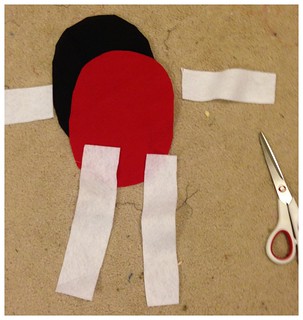 Start by designing your monster. I’ll be showing directions for a one body, 2-armed, 2-legged creature that’s based on a drawing that my 5 year old made recently but you could certainly add horns or teeth or go down to one arm and one leg. You’ll need a front piece and a back piece for your main body (the red oval and black oval on mine), and four rectangular pieces for the arms and legs. To save time on the arms and legs, I cut a 2″ wide strip of fabric and folded it over itself longways (like a hotdog, not a hamburger), meaning I only had to sew up one side instead of both sides! I also went ahead and attached my button eyes, nose, and years.
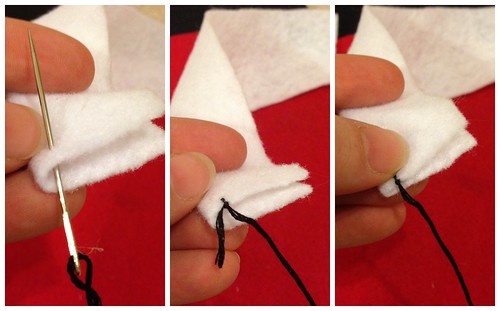 To sew the arms and legs, you’ll want to start by placing your needle in the bottom middle of the short end. Pull it through and knot it towards the end of the thread. Then tuck the excess inside the fold and start sewing around the edges. Nothing fancy, just in and out, in and out. Once you’ve gotten to the top, leave it open so that you can add the stuffing. I like to use a pencil to help pack the stuffing in. Put it aside and finish any other arms/legs/horns/etc that you might be wanting to add.
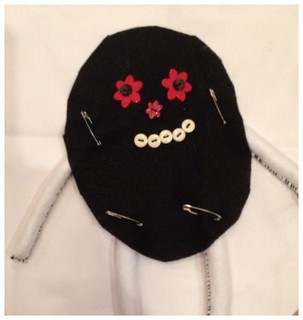 Once you’ve completed all of those, use safety pins to attach them to the front piece of the body. Place the bottom body piece behind that and simply sew around the edges. I used a basic whip stitch around the edges until I got to an arm or leg. Then I sewed though all of the layers (body back, arm/leg piece, and body front) with a simple back stitch so that it would hold it in place really well. Sew almost all the way around the body, leaving a hole big enough for your fingers. Through that hole, add stuffing and then stitch up the hole. I like to make my squishies to be a little tight because they tend to “loosen up” after a little toddler TLC.
To make the monster’s hair, I used a white felt scrap and gathered it together at one end with a running stitch and then sewed it directly onto her head. I added a bow by doing a running stitch down the center of a red scrap. Once the bow was gathered, I did a few extra stitches to hold the pucker in place and then sewed her hairbow on. at the base of the hair.
This project took me less than an hour, but it will certainly take longer for a beginner. (I hope so, really, because with this rough weather we have coming our way, I’m crossing my fingers that the kids will design and make a few more monsters while we’re stuck inside).

Sindy Murray
January 6, 2014 at 11:27 amHow old is your daughter? I would like to try to make something like this with my daughter but I don’t sew. My plan is to buy some beginner sewing kit from Amazon for my daughter and myself and learn together.
Bridget
January 12, 2014 at 9:57 pmShe’s 7. To me, this is a great beginner project because there’s really no way to mess it up! If you have a stitch in the wrong place or things aren’t quite even, it just adds more monster-i-ness! 🙂