
Is anyone else a bit shocked that we are officially into our first week of November? What?!?! Seriously, how did that happen? If your house is anything like ours, then you know that as soon as the kids come back from trick-or-treating, the holidays feel like they start immediately!
Every year, I tell myself that I’m going to have my act together for the holidays, and start planning well in advance, so I can have everything picture perfect when the holidays arrive. Hey, a girl can dream, right? My plan never quite seems to play out how I imagine it in my head, but this year, I am promising myself that I am going to get closer than ever before! Who’s with me on that?!
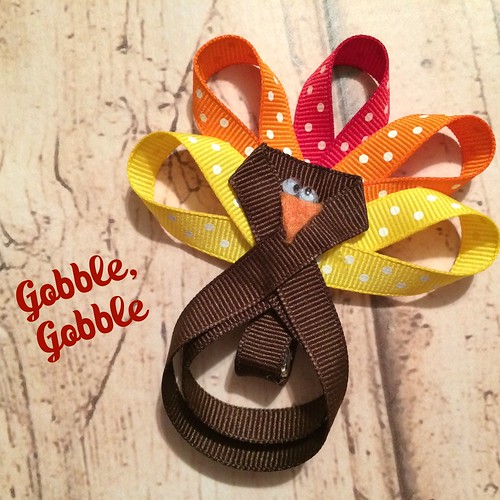
A big part of the picture I’ve painted of the ideal holiday, is that my children always have coordinating outfits that are super cute, and of course, they never get spilled on! {Yeah, right!} Since Thanksgiving is right around the corner, and happens to be my favorite holiday of the year, I figured I had better get going on some spiffy attire for my kiddos. And, so that I don’t bite off more than I can chew, I’m going to start small. That’s where this simple DIY Thanksgiving Turkey Hair Bow comes in. If nothing else, at least my daughter’s hair will be on point with this festive little clip.
This cute little turkey uses minimal supplies, and takes about 30 minutes to make.
Supplies
- hot glue gun
- lighter (for heat sealing ribbon ends)
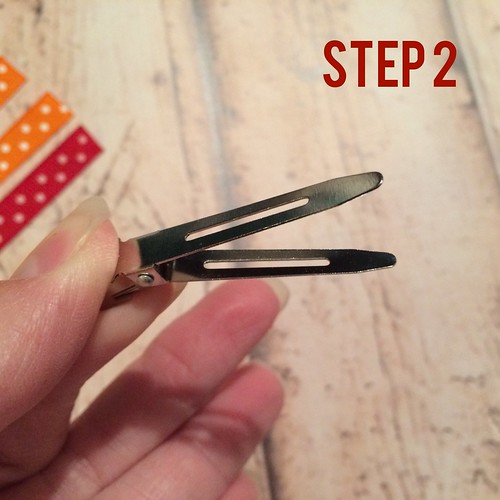
- 1 single prong alligator clip
- ¾” grosgrain ribbon in brown, red, orange and yellow
- 2 small craft eyes
- orange felt or fabric triangle
Step 1
Cut ribbon to the following lengths and heat seal ends with lighter.
- Brown – 8 ¾” (cut 1)
- Brown – 4” (cut 2)
- Red – 4” (cut 1)
- Orange – 4” (cut 2)
- Yellow – 4” (cut 2)
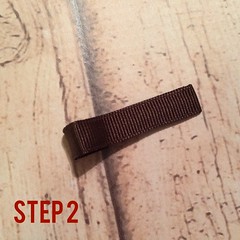
Step 2
Use hot glue to line your clip with 4” brown ribbon.
Create your feathers and turkey body. Place a dot of hot glue at one end of each of the red, orange, and yellow ribbon, then press loose end on glue, overlapping slightly. Do the same with the remaining 4” brown ribbon, but this time, the ends should form a point, making the turkey body appear a bit more round.
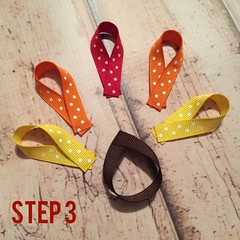
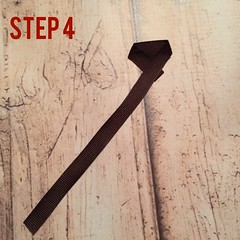
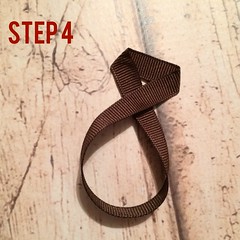
Step 4
Take 8 ¾” brown ribbon and place a small drop of hot glue approximately 1” from one end. Angle ribbon down over glue to begin shaping turkey’s head. Add a second drop of hot glue about ¾” from the first drop, and turn ribbon down there, as well. Finish the turkey’s body by looping long length of ribbon up and behind the bottom of the turkey’s head. Secure with hot glue.
Build your turkey! Begin to arrange feathers on the end of the clip, starting with red. Continue until all feathers are glued. Stack turkey body over feathers and secure with hot glue.
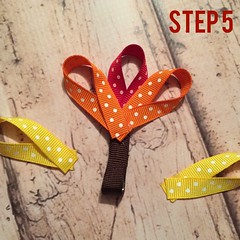
Step 6
Finally, glue orange triangle beak and craft eyes to complete your turkey!

What do you think? Is this something your would make for the little diva in your life to wear on Thanksgiving? What does your ideal Thanksgiving outfit look like for your children? Please share your ideas with us!
Rosie
November 17, 2015 at 12:12 pmawww this is cute! I make fabric flower hair accessories to give away, I must try this!
Keara B.
November 5, 2015 at 11:58 pmThis is so cute! I’m not very crafty, but I think even I could do this. Perfect for Thanksgiving dinner. 🙂 Thanks for sharing!
Sarah
November 10, 2015 at 6:21 pmYou are very welcome! 🙂
Sarah Hayes
November 5, 2015 at 8:16 amThis is really cute. It looks so easy i think I could actually make it. thanks for the idea
Sarah
November 10, 2015 at 6:21 pmYou’re welcome! And you are right, it is very easy to make!
Dandi D
November 4, 2015 at 7:30 amThat looks so cute and simple enough that I can try to make it!
Sarah
November 10, 2015 at 6:22 pmThanks! You should give it a try! It really is a pretty simple project!