
My girls are obsessed with fairies right now. They love looking for magic in the world around them and imagine how fairies could be at work in it. I’m sure this has a lot to do with my daughter’s recent loss of teeth and the curiosity she has around the tooth fairy. So we are embracing this curiosity and creating our very own fairies!
MAKE YOUR OWN FAIRIES
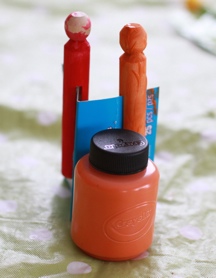
 supplies:
- traditional wooden clothespins
- craft paint & paintbrush
- scraps of fabric, felt, or tulle
- foam paper or cardstock paper
- pipe cleaner
- sharpie
- yarn
- hot glue gun
step 1
Paint your wooden clothespin. You can paint the whole clothespin one color, leave her face without paint, or choose to paint her top half one color (like a shirt) and her bottom half another (like tights). Give her some stripes. Or maybe some polka dots! Then let her dry.
step 2
Using your scrap of fabric, felt or tulle, cut a small skirt or tutu for your fairy. We cut a jagged edged circle shape in our felt and then cut a small “X” shape in the center, just big enough to slide our clothespin through. If your daughter wants to get especially creative, use some small gems, stickers, ribbons, etc. to decorate the fairy’s skirt. Once the paint is dry on your clothespin, slide the skirt onto the clothespin and use a small amount of hot glue to secure the skirt onto your fairy.
step 3
Cut a short piece (2-2.5 inches) of pipe clearer to use for the fairy’s arms. You can adhere the pipe clearer to the back of the clothespin with hot glue or use the slit in the clothes pin and thread your pipe cleaner through. We still used a dab of hot glue in the slit of the clothespin to hold our pipe cleaner arms in place.
step 4
Cut pieces of yarn for your fairy’s hair. This is fun because your daughter can choose her fairy’s hair type! Will she have long locks? A short pixie cut? Or maybe a wild and crazy head of hair like Merida? Use your hot glue gun to attach the yarn to your fairy’s head.
step 5
Another fun customization for your fairy is her wings! Using the foam paper or cardstock paper, cut out your fairy’s wings, being sure to leave a space in the middle that will allow you to attach the wings to the back of the clothes pin. She could have small butterfly wings, large wings, or pointy pixie wings. We used glittery foam paper but you can also use glitter paint, stickers, or gems to decorate your wings. Once they are cut out and decorated, use a bead of hot glue to attach them to the back of your clothespin, just below the head.
step 6
You’ve given your fairy some fashion, now it’s time to give her a personality! Use your Sharpie marker or paint to add a face on your fairy!
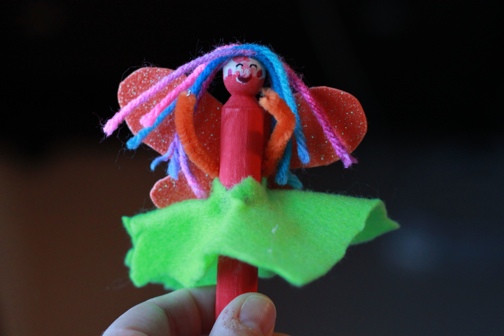
Now it’s time to head out on a fairy adventure!
a simple twist ::
You can use this same method to create Superheros! Instead of creating wings, use your fabric or felt to create a cape and maybe an eye mask for some mystery! Paint your superhero’s emblem on his/her chest and you’re ready to save the day!

Renee
February 16, 2013 at 1:21 pmSo, so precious! I’m going to head out to hobby lobby this week for supplies 🙂 This would be a fun project at a birthday party too!