
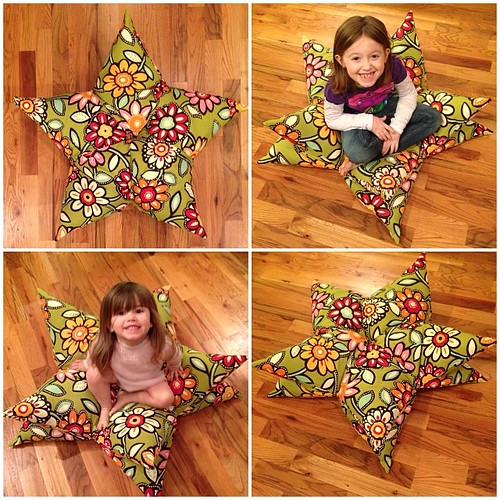
 Over Christmas break, we spent a few days with my brother-in-law and his wife and I fell in love with a star pillow she’d made. She told me that it was pretty easy to make and low-and-behold, she was right! It’s just 15 diamonds sewn together. That’s it! I recently recovered my dining room chairs and had a good bit of fabric left over (because I’m a chronic fabric over-buyer) and decided to use it. I made diamonds with 15″ sides which created a giant pillow. I had 3 bags of stuffing and ran out. It was cold and rainy that day and so instead of going out for more stuffing, I ripped open some pillow forms I’d purchased but never used before and stole the stuffing from them. It’s still not quite as firm as I would like and I’ll probably add a little more soon. Once it’s all said and done, this large pillow will probably have about 6 bags worth of stuffing in it!
My sister-in-law also had a few small ones that were perfect for resting your head because two of the star’s “arms” cradle your neck nicely. For this tutorial, you’ll see the small star pillow that I made. Oh! And before I get started let me say this: when I first started sewing I didn’t know what “right sides” were. So just FYI: Right side = the printed side. Wrong side = the back side. (Also important to note: If you can’t see the details I’m talking about in the images below, just click on them and you should be able to see bigger versions of them.)
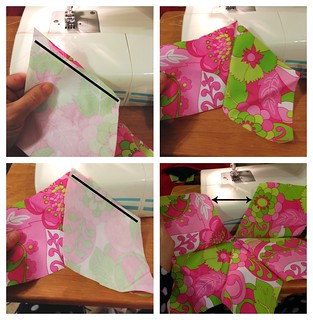
Anyway, you’ll start by cutting out 15 diamonds of your chosen size. Diamonds with 15″ sides make a pretty large floor pillow. Diamonds with 5″ sides is about the size of a small throw pillow. Adjust that based on what size you want your finished product to be. Once you’ve cut out your 15 diamonds, take two diamonds with right sides together and stitch down the side(top left). Sew down where I’ve drawn the black line. Unfold them(top right) and add another diamond with right sides together and sew those two loose sides together (bottom left). Do that with 5 diamonds and then connect the two ends in the same fashion (bottom right). It doesn’t hurt to run a few extra stitches to the center where all the points meet.
Once you’ve made one star, grab five more diamonds and repeat. After completing that, you’ll have 2 stars and 5 loose diamonds.
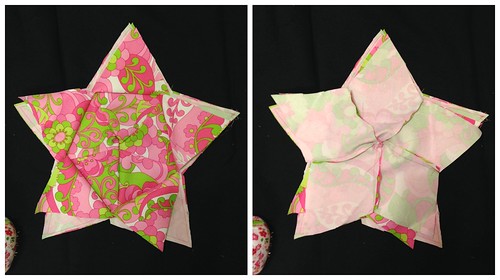
 Now. Here’s the trickiest part. It’s not hard, you just have to pay attention. I really, really, really, really suggest using pins for this step. I’m notorious for skipping the pinning phase and usually it’s okay. But with this? There are just too many pieces that all look the same. When I was making the first one, I spent way too long picking out seams because I’d done it wrong. This is not hard as long as you watch carefully. Put one star to the side for later. Lay the other one flat, with the right side up(aka. wrong side down). Then carefully place the loose diamonds on top of the star and pin along the edges. Then sew along the entire edge of the star.
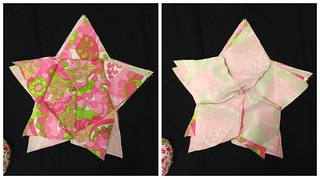
Which leads me to the second trickiest part: adding the other side of the star. You should now have a star that has two wrong sides showing. Take the edges of the loose diamond that were not sewn down and fold them back (left) and the place the other star(the one you set aside earlier) on top of that(right). Now’ll you want to pin those edges. I found that it was easier to start by pinning the spots where all the seams met and then pinning the rest of the edges once those were stable. Then sew almost all the way around the edges. Leave one edge partially open (a space wide enough for your hand to fit through).
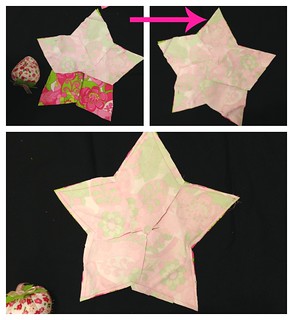
Now, going through the hole you left, pull the whole thing right side out. You’ll have to work the tips of each point so that they aren’t folded up on themselves. And then start stuffing. I don’t have pictures of these two steps because it’s impossible to take pictures while you do it. (I tried)! For the small pillow, I used about 1/2 bag of poly-fil. I might go back and add some to it. Remember that the stuffing is going to compress a little bit more every time you use it, so you want it fairly full. Next you’ll need to sew up the hole. For the big pillow, I stitched it by hand. For the smaller pillow, I held it down and sewed up the edge with my machine. The hand-stitched one looks more polished, honestly, and I’ll probably do that next time I make one.
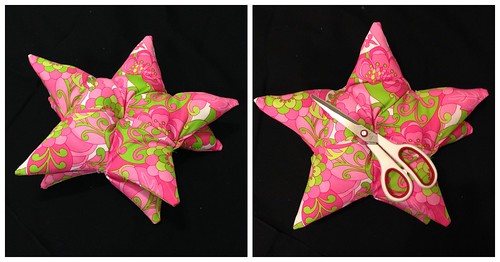
You’re almost done! All you need now is a little cross stitch thread. (You could use regular thread that’d been doubled over, I suppose, but I like the sturdiness of a whole piece of cross stitch thread.) Run the thread from the center of one side to the center of the other side and pull taught, as if you were adding a button to each side. I like to do that a few times to make it really secure. Tie it off and you’re done! (Scissors shown for size comparison).
Materials needed: sewing equipment, fabric, cross-stitch thread, large-eyed needle
Kimberley O
January 24, 2014 at 10:25 amI’m not much of a sewer, but would like to be. These step by step instructions make me feel like I could make this cute pillow successfully! thank you!
Shanda
January 16, 2014 at 9:57 pmI think I am going to make one of these when Dawson gets a little bit older! LOVE!
Kathy J
January 13, 2014 at 2:07 pmThis is so cute! The step by step pics and instructions made it where a novice like myself might actually be successful. Thinking about making one for my niece.