
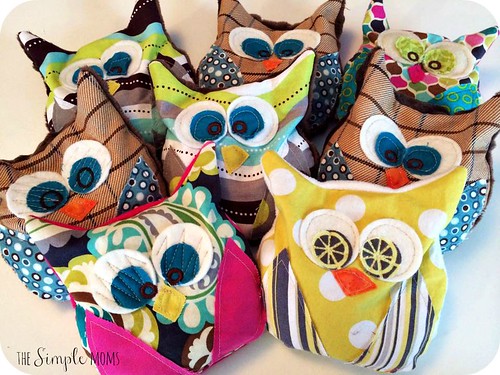
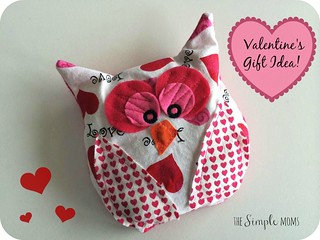
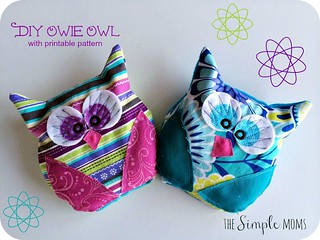
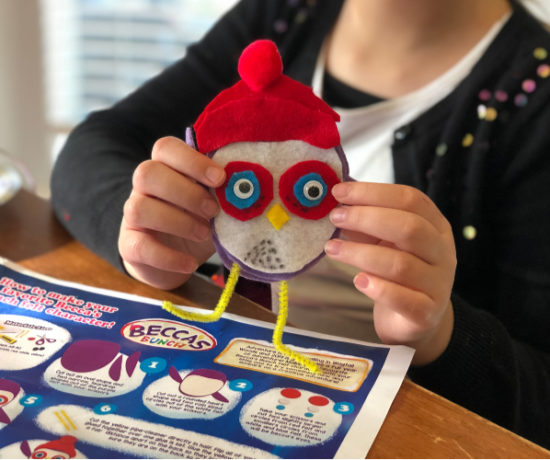
The sad fact of parenting is that at some point, the sweet little people in our lives are going to fall down and get hurt, or catch an illness of some kind. It’s heart wrenching for both the kiddos and caretakers involved! That’s why, a few years ago, I set out to make something that would bring a bit of a smile to my children for when these unfortunate, yet inevitable events happened. Enter, the Owie Owl! This sweet little owl is quite a simple project to complete, takes minimal resources, and is sure to cheer up little ones. They are filled with rice, and can be warmed in the microwave for use as a hot pack, or kept in the freezer for when a cold pack is needed. They’re great to snuggle with during the cold winter months. My kiddos love to have one of these warmed up and tucked in with them at night. So cozy! Owie Owls make adorable shower or special occasion gifts, too!
Here’s what you’ll need for this project…
- printable Owie Owl pattern
- sewing machine
- coordinating fabric (scraps work great for this project)
- coordinating thread
- white rice
- essential oils (optional)
Let’s get sewing!
- Start by cutting out your pattern. (Hint: Quilter’s cotton works great for all parts, but felt for the outer eye circles works well, too. These owls are much cozier when they have a soft fabric like a flannel or minky fabric used for the back body piece. For ease of sewing, especially when using minky, for the back piece, cut a rectangle of fabric slightly bigger than the owl body, sew directly onto that, and then trim the extra fabric.)
- Sew wings, and beak onto the front owl body piece. There is not a specific beak pattern piece, because a small triangle or diamond shaped fabric scrap works great here. These owls are made to have a “scrappy” look to them. Sew about a ¼” from the edge of the wings and beak, making sure to backstitch. A bit of fraying on these pieces adds to the character.
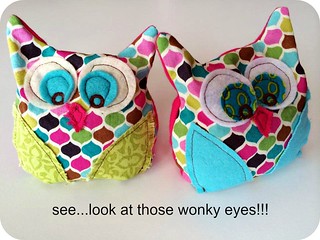
- Sew on the eyes. Personally, I feel that sewing tiny circles on a sewing machine is a bit difficult, and they often turn out looking a bit wonky. I layer my eye pieces and then use a large zig zag type design across the eyes. Leave your needle down, lift your presser foot, and pivot your owl to get this look. Again, this just adds to the character of the owl. For the pupil of the eyes, use a tight zig zag stitch with black thread or other dark coordinating thread, or if you prefer, sew on buttons. (Just be cautious with buttons if you are giving this to a small child to use.) My machine happens to have embroidery letters programmed on it, so sometimes, I use a small “o” for this step.
- With right sides together, sew owl body pieces using a 3/8″ allowance, starting and ending at the dots on the bottom of the pattern, making sure to backstitch. Because rice can be sneaky and work its way out of stitches that are too long, use a stitch length between 2 and 2.5 for this step. After this step, you should have an opening at the bottom of the owl, about three inches in length.
- Fill owl with rice. Be sure not to overfill the owl. Leave enough space so you have room to fit it under your presser foot.
- If you prefer to add a few drops of essential oils, do that now. (optional)
- Fold in fabric at the opening and top stitch closed. Again, use a stitch length between 2 and 2.5. The pattern is rounded at the bottom, but it’s easiest to fold this part in and sew a straight line across the opening. Be careful not to stitch over rice, as it can break your needle…ask me how I know… Backstitch extra here…you don’t want rice spilling out of the owl.
All done! Take this adorable little owl, pop it in the microwave for 30 second intervals until you have your desired temperature, and snuggle up! Or, stash it away in the freezer for the next time someone in your family needs a cold compress.
Care: These owls can be lightly surface cleaned, but they cannot get wet. If they get wet, the rice will be gross. Keep them dry. Also, don’t overheat, as heating too long could potentially set the owl on fire. I haven’t done this before, but I suppose it could happen. Better to be safe than sorry. And finally, when giving these heated owls to children, please check the temperature before allowing sweet little ones to use them. Enjoy!
Time to share! What is your favorite thing to sew? Do you enjoy quick projects, or do you prefer to venture into complex endeavors that require more of a time commitment? And, if you don’t sew, is it a skill you would like to learn? What’s stopping you?!
Right click on image and select “save image as,” to save to your computer and print.

Rosie
September 4, 2016 at 3:02 pmOwie owls what a great idea! and so cute! very creative. I have made teddy bears, etc., and I’m always wondering what to do for the eyes that is really safe – this is perfect for that, too!
katie
May 29, 2016 at 6:46 pmThese are so cute. I want to get to making one of these right away so my daughter can have it cold because as a toddler she is always bumping into stuff!
Shannon
June 2, 2016 at 12:59 pmAwe, that’s so true! 🙂
Carol S.
February 3, 2016 at 10:04 amThank you so much! These are adorable and such a usable item. Such a fast and easy project and a great way to use scraps.
Sarah
February 5, 2016 at 2:00 pmYou are very welcome! These are by far one of my favorite scrap buster projects!