Despite my repeated instruction to stop growing up so darn fast, my oldest is bound and determined to turn 8 this weekend. And even though a little part of my heart is sad at how quickly he is moving from little kid to big kid, I have to say how much I LOVE this age!
His latest obsession is basketball – the Golden State Warriors to be specific. 😉 So what better theme for an 8 year old’s birthday party than basketball everrrrrrrything. We found some cute…I mean savage/lit/awesome plates and napkins to use and have planned a basketball shootout, Lego building competition, and Nerf war. (Whatever it takes to keep six, 8 year old boys busy and not destroying the furniture!)
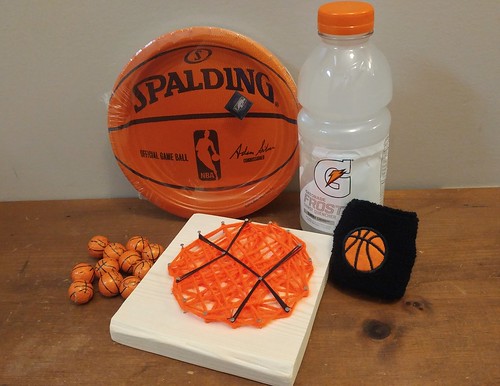
We’ll end the night with pizza and a movie, but I felt like we needed one more activity to help keep things somewhat sane during the party. I know from previous parties that structure is our friend, so I came up with a fun, but simple, craft that isn’t too girly. Basketball string art! Not too complicated. No messy glue. And hopefully they will have fun learning how to hammer nails and create something they can keep in their room at home!
The boys will each get a square piece of wood to hammer nails into, then wrap orange yarn around the nails in the shape of a basketball. We’ll use black thread to add in the basketball details.
You can recreate this activity with the following supplies…and it doesn’t have to be a basketball. The nails can be hammered into the wood in whatever design you prefer! There are many ideas for string art on Pinterest that can be adapted for any size block of wood or skill level. 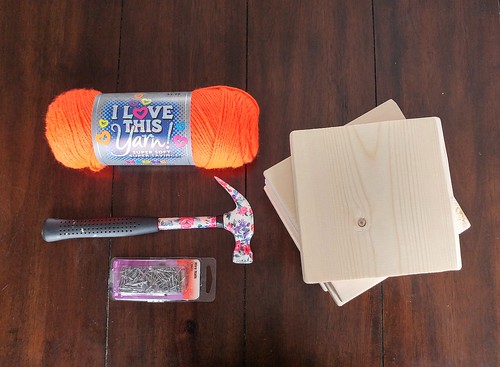
- Square wood blocks in size and depth of your choice (we are using 1/2″ thick wood, cut to 6″ x 6″)
- Finishing nails
- Hammer
- Printed template of shape or design
- Colorful yarn in your choice of color
- Optional: wood stain, to be used ahead of time if desired
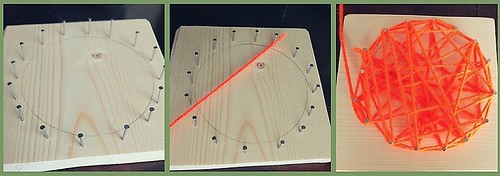
Basically you pound the nails into the wood in whatever shape you’re making, tie one end of the yarn to a nail, and go to town weaving and wrapping the yarn around all the nails. I found it helped to weave the yarn in between all the nails around the perimeter to kind of make the shape “pop”. Once you are content with how it looks, just tie off the yarn and weave the tail in between to hide it.
If you are looking for pre-cut wood, check your local craft store – Hobby Lobby had several shapes and sizes to choose from. I ended up buying a 1 x 6 from Home Depot and cutting it down myself…because why let someone else use power tools if you can use them yourself?! A light sanding with a mouse sander and we were good to go. Be sure to hammer the nails into the wood on a flat surface, and protect your table if that’s where you will be working.
That’s it! A simple, but fun activity that will hopefully buy me the last 20 minutes before our pizza arrives! Now, I’m off to attempt drawing the Golden State Warriors logo on top of a cake using frosting.
Wish me luck 😉
What are some great movies for boys in the 7-9 year old age group? Leave me some ideas in the comments!!